
How I create
Clay
After many years building using lots of different clays, I use an amazing clay called Ashraf Hanna Clay - named after an Egyptian born potter who lives in Wales.
The clay is a lovely white colour, which makes a great background for any colours. Contained within the clay is a fine grog (a ground up fired clay powder), which adds strength to the pots when hand building. It also provides the pots with the ability to withstand the thermal shock during smoke firings.


Coiling
I coil by mainly rolling out the clay to the required thickness for the piece - I then cut the slab of clay into strips. This is a super effective way to build up the walls of the pots and is the way Ashraf Hanna builds.
Each layer is scored by crosshatching the clay, then slip liquid clay is applied, which acts like glue to secure each layer as I build.
Pinch Pots
This is my preferred method for creating my animals.
I take equal quantities of clay and make each into a ball. Using a tool I create a hole, which I then make larger - whilst keeping the walls an even thickness.
The 2 pots are scored and slipped, which creates the basic shape, which I then model to make the animals.


Burnishing
Burnishing is a way to build up a highly polished surface sheen on pottery - which I find very therapeutic. My essential tools are a rounded teaspoon, a metal tool and various crystals.
After smoothing the surface to remove any lumps and bumps, I start preparing the clay surface - using hard implements to gently push the grog back into the surface of the piece.This also adds strength to the walls of the form.
After many hours and at least 5 rounds of burnishing, the surface comes to a high gloss. Once I'm happy I'll allow the piece to dry.
Electric Firing
I fire all my pots to just under 1,000°C in an electric kiln, that is hard-wired in my porch.
My kiln is a little workhorse! It came to me second-hand, and I have fired it 300+ times and it's still going strong!

The Alchemy of Smoke
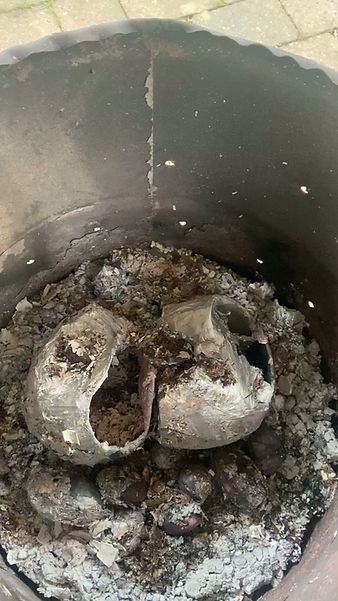
To create the fabulous range of colours each piece is wrapped in foil, this is called a saggar, contained within is a myriad of combustibles: seaweed, banana skins, pink Himalayan rock salt, copper carbonate, copper wire, miracle grow and even my own hair (when available).
Each of these combust and the colours are absorbed on the clays surface . . . simply magical.
My pots are smoke fired in a steel oil drum, placed on top of a saw dust bed, then a layer of kindling before larger pieces of wood are gingerly placed. igniting is always exciting and requires a good blow torch, as I light from the top, allowing the heat to generate as the fire burns down.
Then the long wait begins, the pieces need to be cool before unpacking, this can take 10 hours, but the wait is well worth it. Every time I unpack a firing it's like I am being gifted the most amazing delights, this is my happy time.


Raku Kiln
We made a raku kiln, we, Mark and I, took an oil drum lined it with ceramic fiber and tested it lots before being fully confident with its performance. The kiln will go to 1,000°C in about 30 minutes using propane gas.
The ancient Japanese firing called Raku is very addictive, the results are instantatious and simply magical. I rapidly remove the forms, then using horse hair, feathers and sugar I print onto the red hot surface with combustibles, these burn and carbonise, creating beautiful yet delicate marks on the forms. After washing they are simply polished with beeswax.